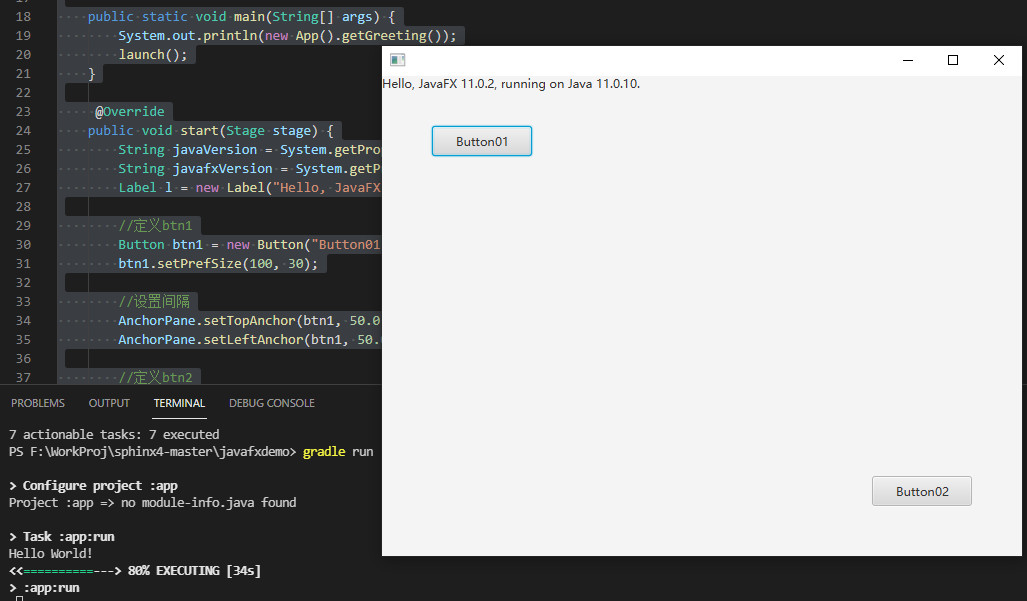
Gradle7.0+VisualStudioCode+Jdk11+JavaFX构建跨平台GUI界面开发
1.Gradle7.0+VisualStudioCode+Jdk11环境这里不再赘述
2.下载JavaFX(不做这一步影响编译,仅打包发布需要用到此SDK包)
官网:https://gluonhq.com/products/javafx/
这里以Windows为例:https://gluonhq.com/download/javafx-11-0-2-sdk-windows/
解压到D盘根目录
3.编写build.gradle脚本
/*
 * This file was generated by the Gradle 'init' task.
 *
 * This generated file contains a sample Java application project to get you started.
 * For more details take a look at the 'Building Java & JVM projects' chapter in the Gradle
 * User Manual available at https://docs.gradle.org/7.0/userguide/building_java_projects.html
 */

plugins {
    // Apply the application plugin to add support for building a CLI application in Java.
    id 'application'
    id 'java-library'
    id 'org.openjfx.javafxplugin' version '0.0.9' //添加openjfx的javafxplugin插件
}

configurations.api.setCanBeResolved(true)

//指定javafx模块引入
javafx {
    version = "11.0.2"
    modules = [ 'javafx.controls' ]
}

repositories {
    // Use Maven Central for resolving dependencies.
    mavenCentral()
}

dependencies {
    // Use JUnit test framework.
    testImplementation 'junit:junit:4.13.1'

    // This dependency is used by the application.
    implementation 'com.google.guava:guava:30.0-jre'

    //api files('libs/javafx.controls.jar')
    //api fileTree(dir:'libs',includes:['*jar'])
}

application {
    // Define the main class for the application.
    mainClass = 'javafxdemo.App'
}

jar {
    manifest {
        attributes 'Main-Class': "javafxdemo.App"
    }
    from {
        configurations.api.collect { it.isDirectory() ? it : zipTree(it) }
    }
4.编写测试代码
/*
 * This Java source file was generated by the Gradle 'init' task.
 */
package javafxdemo;
import javafx.application.Application;
import javafx.scene.Scene;
import javafx.scene.control.Label;
import javafx.scene.control.Button;
import javafx.scene.layout.StackPane;
import javafx.scene.layout.AnchorPane;
import javafx.stage.Stage;
public class App extends Application{

    public String getGreeting() {
        return "Hello World!";
    }

    public static void main(String[] args) {
        System.out.println(new App().getGreeting());
        launch();
    }

     @Override
    public void start(Stage stage) {
        String javaVersion = System.getProperty("java.version");
        String javafxVersion = System.getProperty("javafx.version");
        Label l = new Label("Hello, JavaFX " + javafxVersion + ", running on Java " + javaVersion + ".");

        //定义btn1
        Button btn1 = new Button("Button01");
        btn1.setPrefSize(100, 30);

        //设置间隔
        AnchorPane.setTopAnchor(btn1, 50.0);
        AnchorPane.setLeftAnchor(btn1, 50.0);

        //定义btn2
        Button btn2 = new Button("Button02");
        btn2.setPrefSize(100, 30);
        //设置间隔
        AnchorPane.setBottomAnchor(btn2, 50.0);
        AnchorPane.setRightAnchor(btn2, 50.0);

        //定义AnchorPane,添加node
        AnchorPane anchorPane = new AnchorPane();
        anchorPane.getChildren().addAll(btn1, btn2, l);

        Scene scene = new Scene(anchorPane, 640, 480);//new StackPane(l), 640, 480);
        stage.setScene(scene);
        stage.show();
    }
}
5.编译运行
gradle build
gradle run

6.打包运行
保存脚本start.bat:
SET PATH=D:\Java\jdk-11.0.10+9\bin;%PATH%
SET FX_MOD_PATH=D:\openjfx-11.0.2_windows-x64_bin-sdk\javafx-sdk-11.0.2\lib
java --module-path %FX_MOD_PATH% --add-modules=javafx.controls -jar app.jar
echo &pause
运行脚本,成功。
7.下载exe4j8打包为exe
一步步配置即可,傻瓜式即学即用
8.将Java和openjfx的bin目录配置到PATH临时环境变量
9.winrar直接打包成独立exe,完成